Thursday, December 16, 2010

December Meeting and Copper Coloring Workshop


On this first snowy day of the season, eight of us gathered at Peggy’s house to talk about various methods of putting color on metal, and to try out one of those methods – colored pencil on copper. Thanks to – Caroline, Lucia Briggs, Sandra, Bodil, Naomi, new member Molly, and Ellen Kreiger, for braving the elements.

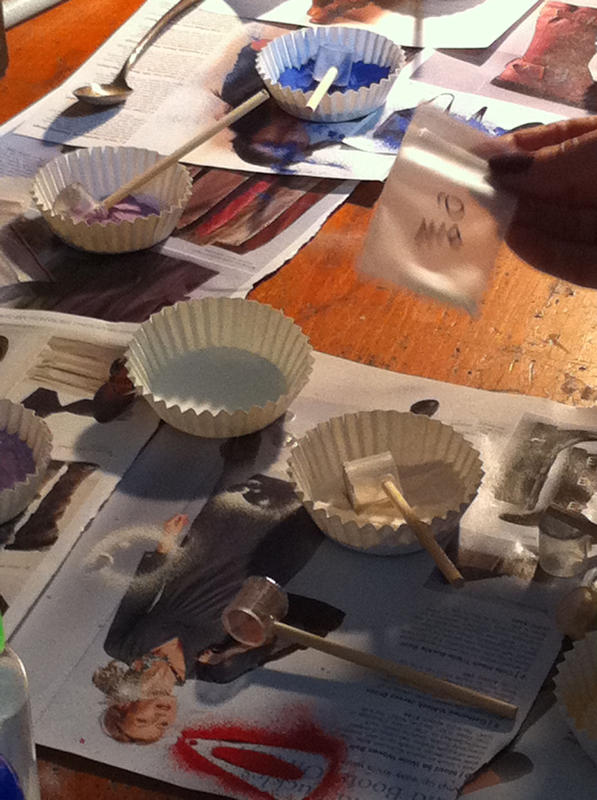
Peggy, who is also quite new at this, showed 10 of her first experimental samples. All begin with roughing up the metal to give it some tooth – using super coarse sandpaper, a mizzie wheel on a flex shaft, a steel wire “Matting Brush” on a bench lathe, a roller printed or hammered texture. This step is followed by a liver of sulfur dip and/or a coat or two of white or black gesso – or neither! Then comes the fun part: applying the colored pencils! At the end of the process the pieces were sprayed with matte acrylic to fix the colors.


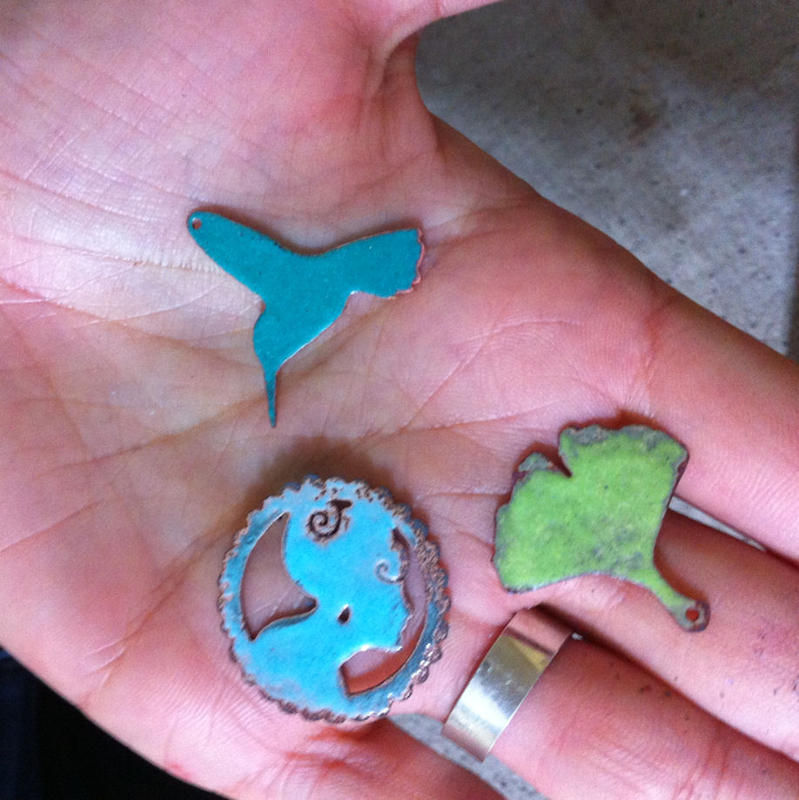
Peggy also showed her first finished projects: napkin rings and earrings:


Before we began coloring our metal, Naomi and Sandra showed us some examples of other metal coloring techniques they’ve used: Heat-coloring, liver of sulfur coloring and the ever-popular ammonia and cat litter method! (No laughing, it produces beautiful results!):


This next piece is by nationally-known artist Deb Karash. She is known for this technique:

Finally, the rest of the group gave it a shot –and got some very interesting results – proving to us all that there are many roads to explore with this. I think we all are excited to do more. This is a wonderfully spontaneous way to get color into our work. Very liberating!!


See you all next time!

Thursday, November 4, 2010

November Meeting and Torch-Fired Enameling Workshop

Thanks so much to Mimi (hostest with the mostest), Amy, Lucia, Ellen, Sandra, Karen, Peggy, Caroline and Dana (me!) for coming to today's get-together. It was so fun to chat and create together!!


Our enameling setup: after spraying pieces with Klyr-Fire, we sifted enamel onto our copper pieces. Sifters were handmade. Buy a length of 3/4"-1" diameter polycarbonate tubing and cut into 3/4" long sections. Glue gun one end/edge to 40-mesh steel screening and cut away excess screening. Glue gun 4" long dowel (any diameter will do- I used 3/16") for a handle and you're good to go!


Pieces cooling by Sandra, Lucia, Peggy and Ellen. Great vibrant colors! We used opaque enamels on copper due to firescale caused by heating. Another option is to use opaque white (or another color) as a base firing and then add layers of transparent enamel on top. When using fine sterling as a base metal, transparents or opaques may be used. Sterling silver needs to be depletion gilded before using. The trivet is key for counterenameling- firing with enamel on both sides.


Some work by Peggy- a new member. Gorgeous use of casted components!


Lucia and her loyal companion watch Ellen try "painting" with wet enamels.


Top pieces by Lucia- she used a variety of colors sifted onto her copper cut-out charms. Bottom piece by Dana using sgraffito. Forming the metal (doming, bending) adds strength which helps reduce cracking of enamel. Many of the pieces made were counterenameled.


More charms made by Lucia.


Varigated acorn charm made by Karen using multiple colors and firings. Magnifique!


More work by Karen- earring daggers also using a mixture of colors. Stages of firing include sugar-fire, orange-peel, and full fuse.


Peggy's piece heating up directly on trivet from underneath.


Dana embedded wire loops and seed beads with a second enamel color into the base color.


Some "leftover" pieces by Ellen. How industrial chic!!


Pooped out from a morning of enameling! Thanks all who came - such a fun morning!!

Saturday, October 2, 2010

First Fall Meeting- Bead Mosaics and Recent Work

This month's meeting was at Caroline's spacious studio- thanks so much Caroline! (The gingerbread was delicious....) We all played around with bead mosaics. Feel free to email Dana for a .pdf of instructions if you're interested.

These are some of the pieces we created with ready-made bezels/frames and freshly grouted (so a bit dark).


Caroline's piece as a work-in-progress. It takes patience and good eyesight to place each bead!


Mimi's piece in progress. Instruction sheets are available. Such fun with colors!


Some of the group working (the other part of the group was eating and hardly working....)


Art in progress...


Now for the fun part- recent work! Karen's acid-etched cuff is not quite done, but it looks pretty good to me!


Sharon's boulder opal pendant (with hand-made chain!) encorporates a partial bezel and decorative granulation.


This is Caroline's work in progress- trying to find a method of encapsulating ribbon accents under a silver leaf-bezel and maintaining it's texture/tooth.


Amy's impressive collection of chain mail creations- some complete, others works-in-progress.


This is Sharon's silver cuff completed over the summer- so modern!


Ellen's pendant with gems is pretty far-out.


These were some of the charms completed over the summer for Patti- one of our own who's fighting brain cancer.


Some of us got together over the summer for a resin workshop (poured into silly putty as a form).

See everyone next month!! Thanks so much for all that you share!